In this article we will discuss how effectively you can use Sass to manage/change multiple themes in your website/cms. I have used materializecss which is very cool and based on Google material design concept.
Sass stands for Syntactically Awesome Stylesheets. It is a style sheet language using which you can program your style sheet by using variables, inheritance, nesting etc. Sass takes these .scss files as input and ganerate actual .css file for you, which is nothing but output of interpreted .scss files.
First of we will setup Sass and then will look into materializecss how we can change the default template design. There are two ways you can use Sass in your project.
- Install Sass command line tool and then generate .css file and use that file in your project
- Find out maven dependency that actually compiles the .scss files.
In this article we will discuss about first option. The reason is most of the time changing the template of website is mostly rare in real life, like once or twice in a year. And using command line it won’t take more then 5-10 mins.
Here we will discuss for windows platform. You can visit http://sass-lang.com/install where they have details for other platform as well.
Steps to install Sass on windows:
- Download latest version of Ruby Installer from http://rubyinstaller.org/downloads/ and install it.
- Now add the bin directory of ruby in path. For e.g if Ruby’s home directory is C:\Ruby22-x64\ the add C:\Ruby22-x64\bin to path variable.
- Now restart the command prompt and run following command. gem install sass
- If you get any error the try following: sudo gem install sass.
- Sass will be installed in bin directory of Ruby. If you ave already added bin directory of Ruby in path variable then it will be accessible from any location. You can double check sass installation with following command: sass -v
Now download materialize css source (Sass version) from http://materializecss.com/getting-started.html. This will contain source .scss files. Now we can modify these files and generate customize materialize css for us. Extract the downloaded source. The extracted source will have folder named sass. In this folder you will find materialize.scss file. This is our source file, from which we generate actual materialize css. To do this again open the command prompt and go to this location of materialize.scss file. Once in that location, run the following command:
sass materialize.scss materialize.css
This will create materialize.css which we will use in our project. Note that this is default css provided and we haven’t customized it yet.
For demo purpose I have created simple static web application which you can download from link provided at end this tutorial. Copy the above sass interpreted materialize.css file in css folder of the web application. In this app you will find simple web page, index.html as follow:
<!DOCTYPE html>
<html>
<head>
<meta name="layout" />
<title>Welcome to Materializecss - Sass way</title>

<link href="https://fonts.googleapis.com/icon?family=Material+Icons" rel="stylesheet">
<link rel="stylesheet" href="css/materialize.css">
<style type="text/css">
body {
	display: flex;
	min-height: 100vh;
	flex-direction: column;
}

main {
	flex: 1 0 auto;
}
</style>

</head>

<body>

	<header>

		<nav>
			<div class="nav-wrapper">
				<a href="#" class="brand-logo">Logo</a>
				<ul id="nav-mobile" class="right hide-on-med-and-down">
					<li><a href="sass.html">Sass</a></li>
					<li><a href="badges.html">Components</a></li>
					<li><a href="collapsible.html">JavaScript</a></li>
				</ul>
			</div>
		</nav>

	</header>

	<main class="grey lighten-4">
	<div class="container">
		<h2>Sign Up</h2>
		<div class="row">

			<form class="col s12">
				<div class="row">
					<div class="input-field col s6">
						<input placeholder="Placeholder" id="first_name" type="text" class="validate"> <label for="first_name">First Name</label>
					</div>
					<div class="input-field col s6">
						<input id="last_name" type="text" class="validate"> <label for="last_name">Last Name</label>
					</div>
				</div>
				<div class="row">
					<div class="input-field col s12">
						<input disabled value="I am not editable" id="disabled" type="text" class="validate"> <label for="disabled">Disabled</label>
					</div>
				</div>
				<div class="row">
					<div class="input-field col s12">
						<input id="password" type="password" class="validate"> <label for="password">Password</label>
					</div>
				</div>
				<div class="row">
					<div class="input-field col s12">
						<input id="email" type="email" class="validate"> <label for="email">Email</label>
					</div>
				</div>
				<div class="row">
				<div class="input-field col s12">
					<button class="btn waves-effect waves-light" type="submit" name="action">
						Submit <i class="material-icons right">send</i>
					</button>
					</div>
				</div>
			</form>

		</div>
		<div class="fixed-action-btn" style="bottom: 125px; right: 150 px;">
			<a class="btn-floating btn-large waves-effect waves-light"><i class="material-icons">add</i></a>
		</div>
	</div>
	</main>
	<footer class="page-footer">
		<div class="container">
			<div class="row">
				<div class="col l4 s12"></div>
			</div>
		</div>

		<div class="footer-copyright">
			<div class="container">
				© 2015-2016 GhariaOnline, All rights reserved. <a class="grey-text text-lighten-4 right"
					href="https://github.com/Dogfalo/materialize/blob/master/LICENSE">Terms and Condition</a>
			</div>
		</div>
	</footer>

</body>
<script src="https://code.jquery.com/jquery-2.1.1.min.js"></script>
<script src="js/materialize.min.js"></script>

</html>
With the default materialize css, the look will be as follow:

Now let’s modify the default materialize css. To do this go to the downloaded materialize-src source folder . In this go to the sass>components folder. Here you will find that module vise they have separated the source code in different file. From these files open _variables.scss file. You will find the first Colors section as follow:
/*** Colors ***/
$primary-color: color("materialize-red", "lighten-2") !default;
$primary-color-light: lighten($primary-color, 15%) !default;
$primary-color-dark: darken($primary-color, 15%) !default;

$secondary-color: color("teal", "lighten-1") !default;
$success-color: color("green", "base") !default;
$error-color: color("red", "base") !default;
$link-color: color("light-blue", "darken-1") !default;
----
---
Here we will be modifying primary color and secondary color with deep purple theme. To do this comment $primary-color and $secondary-color. And add deep purple shade (#673AB7) as primary color and pink accent shade (#F50057) as secondary color.
The modified Colors section of _variables.scss will be as follow:
 /*** Colors ***/
/*** $primary-color: color("materialize-red", "lighten-2") !default; ***/
$primary-color: color("deep-purple", "lighten-1") !default;
$primary-color-light: lighten($primary-color, 15%) !default;
$primary-color-dark: darken($primary-color, 15%) !default;

/*** $secondary-color: color("teal", "lighten-1") !default; ***/
$secondary-color: color("pink", "accent-3") !default;
$success-color: color("green", "base") !default;
$error-color: color("red", "base") !default;
$link-color: color("light-blue", "darken-1") !default;
-----
---
Now generate a new customized materialize.css from sass command line with same command earlier you used.
sass materialize.scss materialize.css
Now copy and paste this new materialize.css in css folder of web application. And refresh index.html in browser. The new look will be as follow:
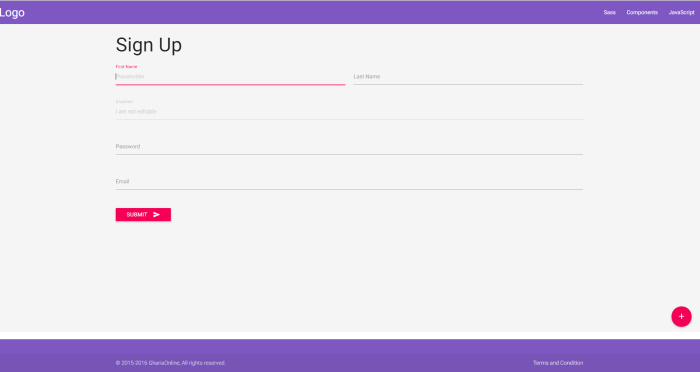
Isn’t this cool ! We did not change any code of our web application and we changed the whole theme. This will be useful in following scenarios:
- You have web application as a product and you are selling to different clients. Now each client has own choice of themes/colors. In this case you can easily change the look in just few tweaks.
- After some time, you got request of changing theme of your application in new release.
In such scenarios, it will save lot of time.
Few tips for choosing the color pallet:
- Use http://www.sankk.in/material-mixer/ tool to choose the combination:
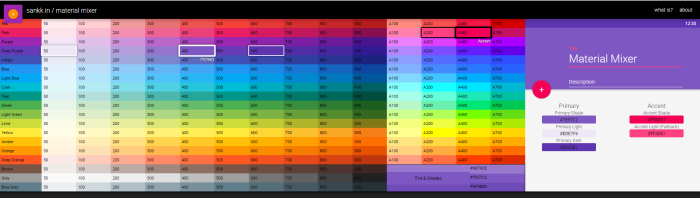
- Once you choose the combination, search for the class of color code in materialize.css. For e.g my primary color code is #7E57C2. Now I will open _color.scss and find that color code. For #7E57C2, I found deep-purple with lighten-1. So my color function would be color(“deep-purple”, “lighten-1”) in _variables.scss file.
- Here we have just focused on _variables.css for changing the theme, but you can achieve more customization by editing other components like _tabs.scss for tabs, _sideNav.scss for side navigation menu etc.
You can download the sample web application from this link following link and play with it.
